Monday, June 17, 2013

My New Favorite Summer Time Drink

There is nothing worse than going back to work (or to school) after spending five wonderful days aboard one of the beautiful Disney Cruise Line ships.  My family and I just returned from sailing on the Dream, and believe me, it was a dream.  We have been very fortunate and blessed to sail before with Disney, and each trip only gets better and better.

It's not wise to leave your drink tray on our table
The Monkey and a duck

Watching the waves roll by


Each day on the ship brings beautiful weather, family fun, and the much anticipated Drink of the Day.  I fell in love with one drink in particular, and I’m not ashamed to tell you that I drank a lot of these….I just won’t define what “a lot” actually is.

Photo found on Pinterest

On the ship, the drink is called a BBC, which I found out is Baily’s Banana Colada.  It is the best drink to sip on while sitting at the pool (or in your garage, which is what I did last night!). 

Bailey’s Banana Colada

5 oz. Bailey’s Irish Cream
16 oz. Pina Colada Mix
1 fresh ripe banana (peeled, of course)
1 ½ scoop of crushed ice

Put crushed ice in the blender.
Add the Irish Cream, Pina Colada Mix, and banana.
Blend for 30 seconds or until smooth.
Pour into a glass (or a coconut if you have it!), and enjoy!

This is definitely going to be my drink of summer!

Until next time....


Wednesday, June 5, 2013

On To The Next Girl Scout Level!

Let me start with explaining to you what a Girl Scout Bridging Ceremony is.  It’s a ceremony that celebrates the transition from one grade-level in Girl Scouting.  Last week, the Monkey’s troop bridged from the Brownie level to the Junior level.  To make it a little simpler for you, the girls will no longer wear their brown vests.  They will now wear their green vests.

The ceremony was short, but very sweet.  It was held in the school's multi-purpose room, and the major piece of eye-candy was this awesome bridge that the Boy Scouts allowed us to borrow.  One of my fellow leaders placed balloons in an arch behind the bridge to give the impression of a rainbow.  Her troop was not the only one bridging that evening.  They shared the stage with a Daisy troop that moved on to the Brownie level.

This bridge was built by the Boy Scouts that attend our school.  
The girls (especially the Daisys) were so excited to actually cross the bridge.  They work so hard throughout the year to fulfill the requirements to move onto the next level.  And let’s admit it…the bridge is cool!

Starting as a Brownie Scout
Leaving as a Junior Scout (we still need the vest!) 
I presented each girl with this little package once they crossed over the bridge.  As you may already know from my previous posts, the girls earn a lot of badges.  A LOT OF BADGES!  I try to give them out in a fun way, and in a way that they won’t get lost before the girls get home, so I tucked them inside the box

Empty Girl Scout cookie box (up cycle!)
Box of Junior Mints (to represent where the girls are heading – to the Junior level)
Package of Brownie Bites (to represent where the girls were – the Brownie Level)
Earned badges
Green nail polish (Green to represent the Junior level)

Please ignore the mess on my counter!
We take a break from scouts during the summer, but the Monkey is heading to Girl Scout camp in a few weeks with one of her friends.  They both aren’t ready to attend a sleep-away camp, so they are going for a camp that will give them the camping experience without having to stay overnight.  It’s for one week, and they are both super excited to go.  Who knows?  This may lead to something!

Until next time…..


Tuesday, June 4, 2013

Pink Lemonade Cupcakes

Yesterday I told you about the chocolate covered peeps I made for the bake sale.  I also made these Pink Lemonade Cupcakes.  Some kids liked them, and some kids thought they were way too sour.  The same goes for the parents.  Here’s the recipe I followed from Real Mom Kitchen (warning: I made some adjustments to the original, so what follows is my version.  If you want the real thing, check out the Real Mom Kitchen website) so I will let you decide.


By the way….all of the cupcakes were sold by the end of the bake sale, so I guess that does say something.


Pink Lemonade Cupcakes

Cake:
1 (16.25 oz) package white cake mix
1 small package (3.4 oz) vanilla instant pudding
3 Tbsp sweetened pink lemonade drink mix 
1 cup sour cream
2 tsp lemon zest
3/4 cup water
3/4 cup oil
4 whites eggs 
6 drops of pink food coloring


Frosting:
1 cup butter, softened
1/2 cup frozen pink lemonade concentrate, thawed
2 tablespoons milk
2 teaspoons vanilla
Zest from 1 lemon
2 pound package  or 7 1/2 cups confectioners sugar
3 drops of pink food coloring

In a large bowl, whisk cake mix, pudding mix, and drink mix together.  Add sour cream, lemon zest, water, oil, and egg whites to the dry mix. Beat with electric mixer on medium speed for about two minutes. Use a strong mixer, this batter is thick.

Scoop batter into 24 lined muffin tins.  Bake at 350 degrees for 15-20 minutes until cupcakes don’t look wet and a toothpick inserted in one comes out clean. Allow to cool completely before frosting the cupcakes.

Prepare the frosting by creaming butter and the lemon zest together. Then add lemonade concentrate, milk and vanilla with a mixer. Beat until smooth.  Then gradually add the sugar, mixing well until light and fluffy. Beat in the food coloring.

Pipe frosting onto the cupcakes. With the straws cut the top 1/3 of the straw off just below the flexible part.  Discard the tops.  Then cut the remaining straw pieces in half.  Place one straw piece in each cupcake to resemble a drink.


Until next time....

Monday, June 3, 2013

Wrapping It Up!

If you find yourself buying “fancy” bags to wrap up your homemade goodies, I have something to tell you.  You are wasting your money.  Seriously…think about it.  Chances are, you are making something for your son or daughter’s class party or bake sale.  You spent some time making this masterpiece, so yeah, you want it to look nice.  But the packaging if often overlooked by little Tommy, who just wants to get to the treat.  He tears it apart, and the fancy packaging is now in the trash can.  That’s money well spent, right?

I made chocolate covered peeps for a recent bake sale at the Monkey’s school, and spent a total of $1 to package them up.  That’s right -- $1.  All you need is a box of sandwich baggies from the dollar store (plus some ribbon, which I had on hand, and you most likely do as well!).

Gather your supplies -- ribbon, sandwich bags, scissors, and your treat.


Cut the zipper seal off of the baggie.


Slip your treat inside the bag, and tie it shut using your ribbon.


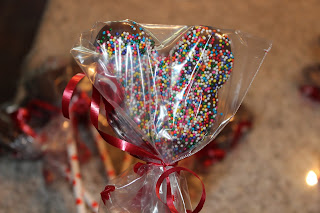
The kids didn't care how it was packaged -- they just wanted the chocolate covered marshmallows inside.

These are cute, right?  I found Mickey Mouse shaped Peeps at Christmas.  I'm not sure why these were made specially for that holiday, because Mickey can be used all year round.  Believe it not, these were super soft five months after I bought them!  And, to gross you out even more, the package wasn't set to expire until October 2014.  Peeps are the new Twinkies...they will last a lifetime.  I wrote about making chocolate covered Peeps earlier this year if you want to try this on your own.


Until next time.....