Friday, November 1, 2013

My Adventures With Pumpkin Cookies

The Monkey’s school holds a Fall Festival each year, and we have not missed one since she started in 2009.  The school’s PTO (which is AWESOME) organizes the festival, and the Monkey loves it.  They have games, a DJ (!), lots of food and drinks, and the ever popular classroom pumpkin contest.  Each class chooses a theme, and then the students decorate pumpkins to reflect it.  It’s really cool, because the students keep their ideas a secret from one another until the day of the reveal.  The secret keeping is amazing in itself, but what’s really amazing are the pumpkins.  This year there were owls, minions, M&Ms, and aliens.  The students put a lot of time and pride in their work.

The Monkey's Class

One of the winning entries


This year the PTO held  its first Pumpkin Bake Off.  Hot damn.  Something I might be good at.  (Spoiler Alert: I wasn’t so good at it).   I filled out my paperwork, submitted my $5 entrance fee, and then searched Pinterest for the absolutely best pumpkin recipe I could find.

I found this one.  The title of the recipe said it all.  Melt In Your Mouth Pumpkin Cookies.

Each contestant had to bring 25 samples of their recipe to the event.  For a $5 fee, festival goers could taste each of the contestants goodies.  The contest was a popular one – there were 15 entries.  Pumpkin cookies, pumpkin cake, pumpkin truffles, pumpkin creme brulee, and pumpkin cupcakes.  This is not a contest to take part in if you are diabetic.  Once you tasted all of the treats, you had to become a judge and pick your favorite.  The contestant that had the most tickets in their ballet box won the contest.

I didn’t win.

Not even close to winning.

How many tickets did I get? 

One.

One freaking ticket.

I am happy to say that no one in my family voted for me (we didn’t take part in the eating).  So, one person out there liked my cookies.  Or they had a heart, and didn’t want me to not get any votes.  Whoever you are, thank you for your pity.

Don't fret -- the cookies didn't go to waste.  My family enjoyed them, and truth be told, the cookies tasted better the next day.  I'm not sure, but it seemed as if the pumpkin flavor came through better the longer the cookies sat around.

Want to give it try?  Just follow the recipe below.  Best of luck! 

Melt-In-Your-Mouth Pumpkin Cookies
(from Better Homes & Garden)

Cookie Ingredients
2 cups butter, softened
2 cups granulated sugar
2 teaspoons baking powder
2 teaspoons baking soda
1 teaspoon salt
1 teaspoon ground cinnamon
1 teaspoon ground nutmeg
2 eggs
2 teaspoons vanilla
1 (15 oz) can  pumpkin
4 cups all-purpose flour

Frosting Ingredients
1/2 cup  butter
1/2 cup  packed brown sugar
1/4 cup  milk
1 teaspoon  vanilla
2 3/4 cups  powdered sugar
 Ground cinnamon (optional)

Directions

Preheat oven to 350 degrees F. In a large bowl, beat 2 cups butter with an electric mixer on medium to high speed for 30 seconds. Add granulated sugar, baking powder, baking soda, salt, cinnamon, and nutmeg. Beat until combined, scraping bowl occasionally. Add eggs and 2 teaspoons vanilla; beat until combined. Beat in pumpkin. Beat in as much of the flour as you can with the mixer. Using a wooden spoon, stir in any remaining flour.

Drop dough by heaping teaspoons 2 inches apart on an ungreased cookie sheet. Bake in the preheated oven for 10 to 12 minutes or until tops are set. Transfer cookies to a wire rack; let cool.


In a small saucepan, heat 1/2 cup butter and brown sugar until melted and smooth. Transfer to a medium bowl. Stir in milk and 1 teaspoon vanilla. Beat in powdered sugar until smooth. Spread frosting on cookies. If desired, sprinkle with additional cinnamon. Makes about 60 cookies.


Friday, July 26, 2013

Jello Molds -- For the Young and the Old

When I say the words Jello Mold, what comes to mind?  For me, I think of old ladies that lunch.  Isn't that something they would bring to a lunch?  Jello in the shape of something, with fruit in it?  I also think of Aunt Bethany from Christmas Vacation.  She was kind of enough to bring a special jello mold to dinner.


Every so often, you can find special Jello molds in the grocery stores, especially when a kids movie comes to the theaters.  I wasn't looking for this Monsters University mold, but when I saw it, I picked it up. I attempted to make Jello Jigglers, but those were an epic fail.  EPIC. FAIL.


I started to think of what else I could use this mold for.  Clay?  Really?  What the heck would I do with a clay monster.  Melted crayons?  Aren't they all the rage right now?  I see a lot of crayon ideas on Pinterest.

How about candy?  This mold is really no different than the chocolate candy molds you can purchase from the arts-and-crafts store.  In fact, this one is way cooler because its Monsters University.  You can make your own chocolate monster.

The gangs all here
Meet Squishy

This is Art, who is voiced by Charlie Day (who happens to be my favorite from It's Always Sunny in Philadelphia)

Mike

Sully

It's not rocket science to make these.  You need to get chocolate wafers, which you can find at the arts-and-crafts store, or even your grocery store.  Following the melting directions on the packaging, pour the chocolate in the mold, and allow the candy to set.  The entire process takes less than a 1/2 hour.  I only had milk chocolate on hand, so mine look a little boring.  You could really jazz things up by using the colored chocolate -- make a blue Sully and a green Mike.  The sky is the limit.


And if you haven't seen Monsters University yet, I just have to ask....What are you waiting for?


Until next time.....

Wednesday, July 24, 2013

It's Beginning To Look A Lot Like Christmas.....

The coolest thing arrived in the mail today.

THIS!


That's right.  The Monkey got a postcard from her Elf on the Shelf, Bob.  He and his other elf friends are on a much needed, and equally deserved, Florida vacation.  Bob is having a great time, and by the looks of the photo, he is hanging pool side with his girlfriend.

His girlfriend?!  That blew the Monkey's mind.  Who knew Elves could date?  She thought they were too busy making the toys.  Speaking of his girlfriend, check out her bikini.  She's rocking it.

I can't take any credit for this awesome idea.  This postcard came from Elf Outfitters, a new business that took legs in December 2012.  The creators wanted to raise the bar, so they came up with great accessories for the elves, including cool dress up kits.  My favorite is the Elf Superhero Kit because we are a house of superhero fans, and I think a lot of parents can agree -- the Elf can often save the day!  The website also has free printables like scavenger and treasure hunts.  They also send postcards like the one the Monkey received so your child can experience the magic throughout the year.


Here's the cool thing.....my first giveaway!  I have been given the chance to offer one of my readers a $10 gift certificate to Elf Outfitters.  That's right!  You can get your own Superhero Kit and postcard!  Here's how to enter.

  • Visit Elf Outfitters, and check out all the cool stuff they have to offer (including free printables!).
  • Leave a comment in this post with your name, email address, and be sure to tell me what your favorite Elf Outfitters accessory is and why.
  • Enter by Friday, July 26th, at midnight.  On Saturday we will randomly choose a winner.
  • Be sure to LIKE Elf Outfitters on Facebook.

Good Luck Everyone!

**Legal News: I was compensated for this blog post with a personalized postcard.  All opinions are my own.

Monday, July 8, 2013

Message In a Bottle

I love getting mail.  Let me rephrase that.  I love getting letters in the mail.  I hate getting bills in the mail.  Too often, we text, email, or post messages on our loved ones Facebook walls  We rarely take the time to sit down and hand write someone a note.  Isn’t it a nice feeling to open your mailbox and find a letter addressed to you?

The Monkey made some friends while we are on our recent cruise, and they agreed to become pen pals.  The idea is a great one – it not only allows the Monkey to practice her writing, but it allows her the opportunity to continue the friendships she created on our vacation.  She and the other girls became fast friends – they spent time at the pool and in the kids club together, and whined when it was time to leave.  In fact, they broke out into tears when they had to say goodbye.  It was heart breaking.

We decided to start the letter writing first, and the Monkey couldn’t just do a simple letter.  No, that would be easy.  She wanted to send them a letter in a bottle.  I guess it reminded her of our time on the beach in the Bahamas. 

I have sent various items in the mail in the past, such as boxes of movie candy, flip flops, and school supplies (search for ideas on Pinterest!), so I was used to sending out unusual mail. 
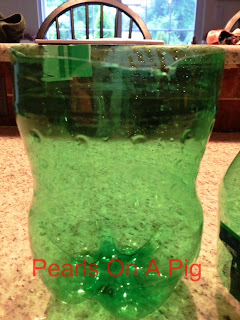
  • Slice a two litter bottle in half (make sure it’s empty!).  I used a pair of scissors, and cut along the middle.  I’m sure you could use a sharp knife and get the same results.  Be sure to cut evenly to avoid sharp edges.


  • Use soap and hot water to clean the bottle, and allow it to dry completely.
  • Fill up the bottle with whatever you want to send.  The Monkey included Disney themed stickers (to remind them of the cruise), a letter, a drawing, and two Disney hair clips that I made.


  • Place the upper half on the bottle on the lower half, and tape it back together using packing tape (it’s clear!).
  • Place your address label over the seam to cover it up.  We taped the label with more packing tape.
  • Be sure to put your cap back on the bottle (we taped that as well).

That’s it!  The only thing left to do is to go to the post office and expect a bunch of crazy looks from the staff there.  I think that's worth it, because I imagine that the girls will love getting this in the mail.

The next time you need to say thank you to someone, don't send them a text.  Take five minutes, and grab a piece of paper, and write them your thanks.  It will be much appreciated.

Until next time.....

Monday, July 1, 2013

I Scream, You Scream

There are a ton of gift basket companies out there, and I have to be honest with you.  If you spend a dime with them, you are NUTS!  Putting a basket together is not a difficult task, and with the popularity of Pinterest, the choice of themes is endless.

A co-worker mentioned the other day that she wanted to send a special thank you to someone that helped her out.  I jumped at the chance to lend a hand, because I enjoy putting these type of packages together.

I love ice cream any time of the year, but there is nothing like enjoying a ice cream cone in the summer.  I love when the ice cream truck comes down our street.  I think I run out the door faster than the Monkey does.  With that in mind, I put together this Ice Cream Party Basket – it includes sundae dishes, milk shake glasses, various ice cream toppings, festive napkins, an ice cream scooper, and straws.

Not including the time I spent buying the material (which I did during my weekly grocery shopping), and the time I spent putting it together (max of 10 minutes), I spent $42 on this basket.  Something homemade add a little bit more to the gift, don't you think?  Don't be afraid to something like this on your own.  The types of baskets you can do is endless: B-B-Q, crafts, baking, you name it!

You can find all these toppings at your local grocery store

The cups were $1.99 and the glasses were $2.49.  Way cheap, right?!

Fits like a glove

The finished product
Until next time....

Monday, June 17, 2013

My New Favorite Summer Time Drink

There is nothing worse than going back to work (or to school) after spending five wonderful days aboard one of the beautiful Disney Cruise Line ships.  My family and I just returned from sailing on the Dream, and believe me, it was a dream.  We have been very fortunate and blessed to sail before with Disney, and each trip only gets better and better.

It's not wise to leave your drink tray on our table
The Monkey and a duck

Watching the waves roll by


Each day on the ship brings beautiful weather, family fun, and the much anticipated Drink of the Day.  I fell in love with one drink in particular, and I’m not ashamed to tell you that I drank a lot of these….I just won’t define what “a lot” actually is.

Photo found on Pinterest

On the ship, the drink is called a BBC, which I found out is Baily’s Banana Colada.  It is the best drink to sip on while sitting at the pool (or in your garage, which is what I did last night!). 

Bailey’s Banana Colada

5 oz. Bailey’s Irish Cream
16 oz. Pina Colada Mix
1 fresh ripe banana (peeled, of course)
1 ½ scoop of crushed ice

Put crushed ice in the blender.
Add the Irish Cream, Pina Colada Mix, and banana.
Blend for 30 seconds or until smooth.
Pour into a glass (or a coconut if you have it!), and enjoy!

This is definitely going to be my drink of summer!

Until next time....


Wednesday, June 5, 2013

On To The Next Girl Scout Level!

Let me start with explaining to you what a Girl Scout Bridging Ceremony is.  It’s a ceremony that celebrates the transition from one grade-level in Girl Scouting.  Last week, the Monkey’s troop bridged from the Brownie level to the Junior level.  To make it a little simpler for you, the girls will no longer wear their brown vests.  They will now wear their green vests.

The ceremony was short, but very sweet.  It was held in the school's multi-purpose room, and the major piece of eye-candy was this awesome bridge that the Boy Scouts allowed us to borrow.  One of my fellow leaders placed balloons in an arch behind the bridge to give the impression of a rainbow.  Her troop was not the only one bridging that evening.  They shared the stage with a Daisy troop that moved on to the Brownie level.

This bridge was built by the Boy Scouts that attend our school.  
The girls (especially the Daisys) were so excited to actually cross the bridge.  They work so hard throughout the year to fulfill the requirements to move onto the next level.  And let’s admit it…the bridge is cool!

Starting as a Brownie Scout
Leaving as a Junior Scout (we still need the vest!) 
I presented each girl with this little package once they crossed over the bridge.  As you may already know from my previous posts, the girls earn a lot of badges.  A LOT OF BADGES!  I try to give them out in a fun way, and in a way that they won’t get lost before the girls get home, so I tucked them inside the box

Empty Girl Scout cookie box (up cycle!)
Box of Junior Mints (to represent where the girls are heading – to the Junior level)
Package of Brownie Bites (to represent where the girls were – the Brownie Level)
Earned badges
Green nail polish (Green to represent the Junior level)

Please ignore the mess on my counter!
We take a break from scouts during the summer, but the Monkey is heading to Girl Scout camp in a few weeks with one of her friends.  They both aren’t ready to attend a sleep-away camp, so they are going for a camp that will give them the camping experience without having to stay overnight.  It’s for one week, and they are both super excited to go.  Who knows?  This may lead to something!

Until next time…..


Tuesday, June 4, 2013

Pink Lemonade Cupcakes

Yesterday I told you about the chocolate covered peeps I made for the bake sale.  I also made these Pink Lemonade Cupcakes.  Some kids liked them, and some kids thought they were way too sour.  The same goes for the parents.  Here’s the recipe I followed from Real Mom Kitchen (warning: I made some adjustments to the original, so what follows is my version.  If you want the real thing, check out the Real Mom Kitchen website) so I will let you decide.


By the way….all of the cupcakes were sold by the end of the bake sale, so I guess that does say something.


Pink Lemonade Cupcakes

Cake:
1 (16.25 oz) package white cake mix
1 small package (3.4 oz) vanilla instant pudding
3 Tbsp sweetened pink lemonade drink mix 
1 cup sour cream
2 tsp lemon zest
3/4 cup water
3/4 cup oil
4 whites eggs 
6 drops of pink food coloring


Frosting:
1 cup butter, softened
1/2 cup frozen pink lemonade concentrate, thawed
2 tablespoons milk
2 teaspoons vanilla
Zest from 1 lemon
2 pound package  or 7 1/2 cups confectioners sugar
3 drops of pink food coloring

In a large bowl, whisk cake mix, pudding mix, and drink mix together.  Add sour cream, lemon zest, water, oil, and egg whites to the dry mix. Beat with electric mixer on medium speed for about two minutes. Use a strong mixer, this batter is thick.

Scoop batter into 24 lined muffin tins.  Bake at 350 degrees for 15-20 minutes until cupcakes don’t look wet and a toothpick inserted in one comes out clean. Allow to cool completely before frosting the cupcakes.

Prepare the frosting by creaming butter and the lemon zest together. Then add lemonade concentrate, milk and vanilla with a mixer. Beat until smooth.  Then gradually add the sugar, mixing well until light and fluffy. Beat in the food coloring.

Pipe frosting onto the cupcakes. With the straws cut the top 1/3 of the straw off just below the flexible part.  Discard the tops.  Then cut the remaining straw pieces in half.  Place one straw piece in each cupcake to resemble a drink.


Until next time....

Monday, June 3, 2013

Wrapping It Up!

If you find yourself buying “fancy” bags to wrap up your homemade goodies, I have something to tell you.  You are wasting your money.  Seriously…think about it.  Chances are, you are making something for your son or daughter’s class party or bake sale.  You spent some time making this masterpiece, so yeah, you want it to look nice.  But the packaging if often overlooked by little Tommy, who just wants to get to the treat.  He tears it apart, and the fancy packaging is now in the trash can.  That’s money well spent, right?

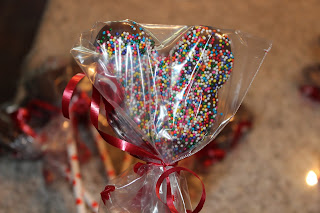
I made chocolate covered peeps for a recent bake sale at the Monkey’s school, and spent a total of $1 to package them up.  That’s right -- $1.  All you need is a box of sandwich baggies from the dollar store (plus some ribbon, which I had on hand, and you most likely do as well!).

Gather your supplies -- ribbon, sandwich bags, scissors, and your treat.


Cut the zipper seal off of the baggie.


Slip your treat inside the bag, and tie it shut using your ribbon.


The kids didn't care how it was packaged -- they just wanted the chocolate covered marshmallows inside.

These are cute, right?  I found Mickey Mouse shaped Peeps at Christmas.  I'm not sure why these were made specially for that holiday, because Mickey can be used all year round.  Believe it not, these were super soft five months after I bought them!  And, to gross you out even more, the package wasn't set to expire until October 2014.  Peeps are the new Twinkies...they will last a lifetime.  I wrote about making chocolate covered Peeps earlier this year if you want to try this on your own.


Until next time.....

Friday, May 17, 2013

And The Award Goes To....

Girl Scouts can earn a variety of badges throughout the year.  Let me say that another way.  The girls can earn A LOT of badges.  Seriously, there is a badge for everything.  Picked up trash at the park?  There’s a badge for that?  Helped at a bake sale?  There’s a badge for that.  Went Christmas caroling at the retirement home?  There’s a badge for that.  These types of badges are called “Fun Badges”, and they are placed on the back of a girls vest.  Some troops opt to not earn these types of badges because of the expense. 
Not our troop!  The girls love getting these types of badges.  They proudly wear them on their vests, and some have earned so many that they ran out of room and put them on their bags.  These badges act as a walking history of the troop.


I had a good amount to hand out at our last meeting, and wanted to do something a little more than just throwing them in a sandwich bag and handing them over.  Search Pinterest (where else!), and you will find a ton of ways to distribute badges.  Some troops go above and beyond what I can even imagine!  I had seen these ribbon awards on several boards, and thought they were cute.  Here’s how I did it:

Gather up the following:
  • Cupcake liner (I found that the aluminum foil ones are best)
  • 1” wide grosgrain ribbon
  • Glue
  • Cardstock
  • Safety Pin
Flatten the cupcake liner with your hand so it will fan out into a circle.  You can stop there, or you can put the liners between the pages of a thick book, which is what I did.  This will really help you to flatten them.

Using the scientific “Eyeball Method”, determine the length of ribbon needed.  This is based on the amount of badges per girl.  Some girls will have longer ribbons than others.  Each award requires two strips of ribbon.

Put a little bit of hot glue on the back of the badge, and place on the ribbon.  Don’t worry about the badges getting stuck to the ribbon.  You are using such a small amount that it will be easy to pull them off.

Glue the ribbon to the back of the cupcake liner.

Add a little something to the middle of the cupcake liner – the sky is the limit.  You can cut a piece of card stock into a circle, write the scout’s name on it, and then glue to the middle of the liner.  I had these cute little circles in my craft stock, and they worked perfectly.

I put a safety pin on each award, which allowed me to pin the awards to the girls at the meeting. 


This is a great idea for the following reasons:
  1. The girls immediately pinned the awards to their shirts at the meeting.  I think they were into it, which is always a good thing.
  2. Having the award ribbons pinned to the girls ensured that the badges made their way home.  I always fear that badges get lost.
  3. The craft itself cost me $0 to make, as I had all of the supplies on hand. 


Until next time…..

Thursday, May 16, 2013

Time To Girly It Up

I pulled out the old sewing machine this weekend because I came across this idea on Pinterest, and fell in love with it. 

This is the Monkey’s R2D2 shirt.  She has had it for several years, but stopped wearing it because it’s not a “shirt for girls’.  Her words, not mine.  I can’t argue with her, because I did buy it in the boys section of Target.  I can never find cute Star War shirts for her (or for me!).  This is how I am going to “girly” things up until someone taps into that market.


Snip off the arms, snip off the neck, make a simply straight stitch on the front and back, weave a strip of leftover t-shirt (or ribbon) through, and tie it up.  Done!  Easy, right?  Check out the instructions over at Crafter Hours for full details.


Until next time.....

Wednesday, May 15, 2013

Puff Mobile Challenge 2013


Ladies and Gentleman….Welcome to the 2013 Puff Mobile Classic!  Girls….start your engines.

This is a fun activity that you can do with kids, and with adults.  Gather up the following supplies: four (4) lifesavers, three (3) drinking straws, two (2) paper clips, a piece of paper, and a strip of masking tape.  Provide these instructions: Using these materials, construct a vehicle that is powered only by air.  You don’t have to use all of the items provided, but you can’t use anything other than what was given.

You will be amazed at how similar, yet different, the vehicles will be.

.


You can line all the vehicles up, and have a large race.  Or you can do head-to-head heats.  We did both at our Girl Scout meeting.


Ready!  Set!  Blow!


Until next time....